Wireless Keyboard Not Working
Your Windows PC can use many types of input devices – a mouse, touchscreen, touchpad, and keyboard. The keyboard has been around as long as personal computers. It was the initial way people interacted with their machines. You’ll most certainly need one if you want to type a report, do your own taxes, or write a blog (like this one) – as well as numerous other tasks.
How Do You Connect a Wireless Keyboard?
Plug-n-Play (PnP) devices have been around for quite some time now. Most hardware, such as keyboards, take advantage of this feature.
Therefore, connecting a wireless mouse is typically as simple as just plugging the accompanying USB receiver into an available USB slot and allowing Windows to set everything up.
That said, if the wireless keyboard requires special software or drivers, you’ll want to install these first – then simply plug in the device afterward.
Wireless Keyboard not Working After Setup
Sometimes, actions that should be simple just don’t turn out that way – things do tend to go wrong.
If the wireless keyboard doesn’t work after Windows sets it up – or fails to be detected at all – there are some things you can do to troubleshoot the issue.
Remove and Plug Back in the USB Receiver
The receiver that connects your wireless keyboard to your computer resembles a small thumb drive.
If you’ve plugged this in but Windows doesn’t seem to recognize it (even after installing any software that came with the keyboard), you may want to try a quick resync.

Test removing and plugging it back in. You can also test plugging it into another USB port.
If nothing still occurs, check the keyboard itself for a button (typically on the backside) that forces a sync with the receiver.
Check the Batteries in the Keyboard
No device has the chance of working without some form of power – your wireless keyboard being no exception. If your keyboard uses standard batteries, remove and reinsert these. If that doesn’t help, replace them with a different or newer set.
Some keyboards use built-in rechargeable batteries. If your device falls into this category, you may need to charge the battery fully before using.
Remove the Keyboard from Windows and Try Again
If the keyboard’s receiver was detected and installed in Windows – but still fails to work – you can remove it from Device Manager, reboot the machine, and then test configuring it again.
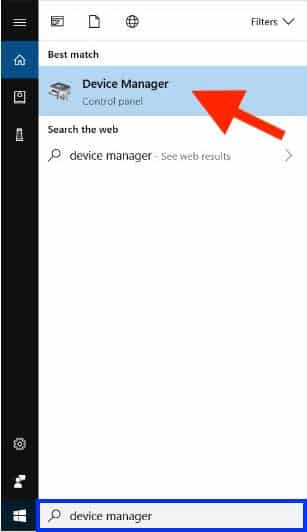
Go into Device Manager using the search box on the taskbar.

Find the keyboard (or its USB device), right-click, and choose Uninstall Device.
Reboot the machine and run through the steps to sync it again.
Test the Keyboard on Another Computer
If all else fails, try testing the wireless device on a different machine. If the problem persists on the test subject, it’s likely time to contact the manufacturer for support.
If the keyboard works on the test box, then there is another important thing you can check on the machine that doesn’t work – continue reading on for more information on that.
Why Device Drivers Might Be the Issue
Every device on your computer requires software that communicates between the hardware and the operating system. While this software, called device drivers, is required for your hardware to work properly, it can also be the cause of issues surrounding it.
The reasons for this can be poorly written drivers, incorrect drivers being used, missing drivers, or drivers that need to be updated in order to continue working with (an updated) Windows operating system.
There is more than one way to update drivers. A straight-forward approach is to allow Windows to try and locate the correct driver itself – and install it.
Go back into Device Manager using the taskbar’s search box.

Right-click the device you wish to update and select Update driver.

Two selections will emerge. Select the first one – Search automatically for updated driver software.
Manually Search for and Install Drivers
Windows doesn’t always find the best or latest drivers.
In such a case, you can search for the driver yourself. You’ll want the exact model of the hardware (and perhaps other details such as a serial number) before attempting to find the right one. If you do find the latest driver, download and unzip it to a location easy to find later.
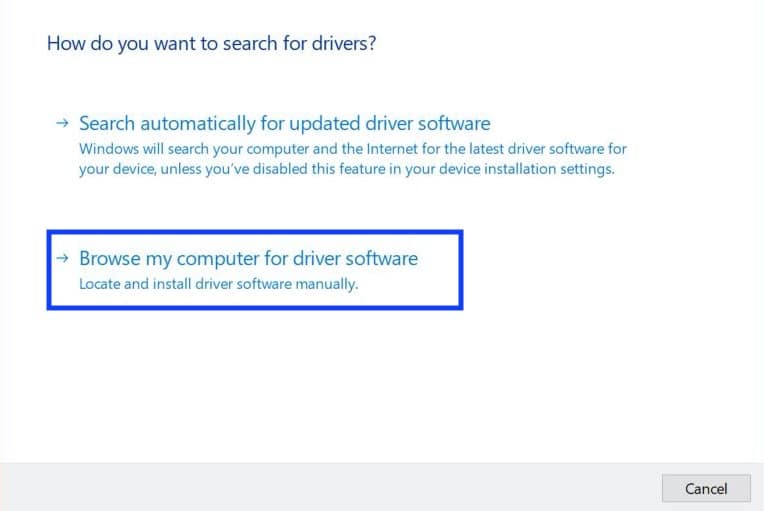
Then go back into the Device Manager (see prior steps) and choose the second option – Browse my computer for the driver software. Drill down to the location you saved the file and select it.
Automate Device Driver Updates
The prior steps involved going into the Device Manager and choosing whether to trust Windows to find the right driver or search for one yourself.
There is, however, a third option.
You can use software, such as Driver Support, to automate the task of searching for and installing the latest drivers for your hardware. This approach not only keeps your hardware updated, but does so without requiring your efforts.

Driver Support Can Help Keep Your Devices Working
Keeping all the device drivers on your computer current can become very time-consuming. Consider offloading this burden to Driver Support.
Once installed, Driver Support will inventory your computer for all supported devices. The fully registered service will update any driver that is missing or out of date.
Since 1996, Driver Support has been trusted to keep your devices running smoothly. Give DriverSupport | ONE a try today! today to get started.