Things to Try If You Cannot Scan After Upgrading to Mac OS X 10.10
One of the things that Mac users like best is the simplicity and expectation that everything will “just work”. In most cases, software updates can be set to schedule automatically without any work on your part. Most devices are plug-and-play.
In some cases, such as with the operating system update to Mac OS X Yosemite, there was a known issue with many printer/scanner devices, and users cannot scan after the update. This issue impacted scanners from all major manufacturers, including HP, Canon, Epson, and Lexmark.
The good news is that with a few at-home troubleshooting tips, you can get your scanner back online.
Troubleshoot Scanning Issues on Mac OS Yosemite
Before you get frustrated with a scanner that’s not working, start with a few connection checks between the computer and the scanner.
- If you are scanning to print, check to make sure the printer/scanner has ink and paper. If there are any blinking lights on the printer, it may not have ink or paper.
- Check the power connection to ensure the device is turned on.
- Ensure the link to the scanning device and computer, wired or wireless, is functioning. Lights on the device will often blink if there is a connectivity issue, or you can try printing a test page from your computer to ensure the device is working if it is a print/scan model.
If none of these steps get your scanner working again, there could be another issue impacting your computer and device ensuring you cannot scan after upgrading to Mac OS X 10.10.
Troubleshooting Tasks
If you know everything is connected and has power, there are more advanced troubleshooting steps that you can take. Follow these instructions in order, and stop at any point if the scanner starts working again.
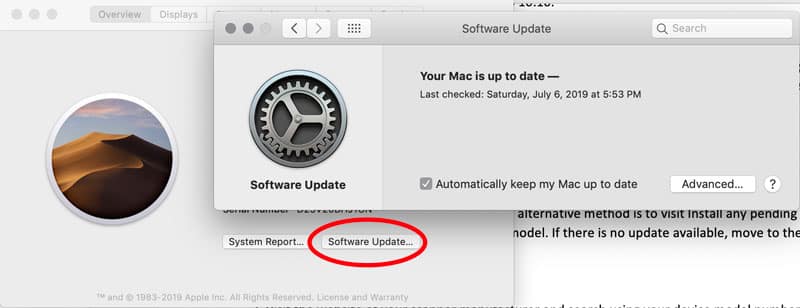
Check for Software Updates
Start by checking for newer versions of your scanner’s software that are compatible with your Mac OS 10.10 operating system.
- Visit the App Store and click “Updates.” An alternative method is to click the Apple icon, then About this Mac, and then click the Software Update button. Install any pending updates that match your scanner make and model. If there is no update available, move to the next step.

 Visit the website of your scanner manufacturer and search using your device model number. If there is an applicable update, download it and install using the instructions from your manufacturer.
Reinstall the Scanner
- Visit your computer’s System Preferences and click the Printers & Scanners option.

- Look for the scanner that is not working on the list provided. You may have one or more scanners present.
- Click on the scanner name and then click the minus to uninstall that scanner.
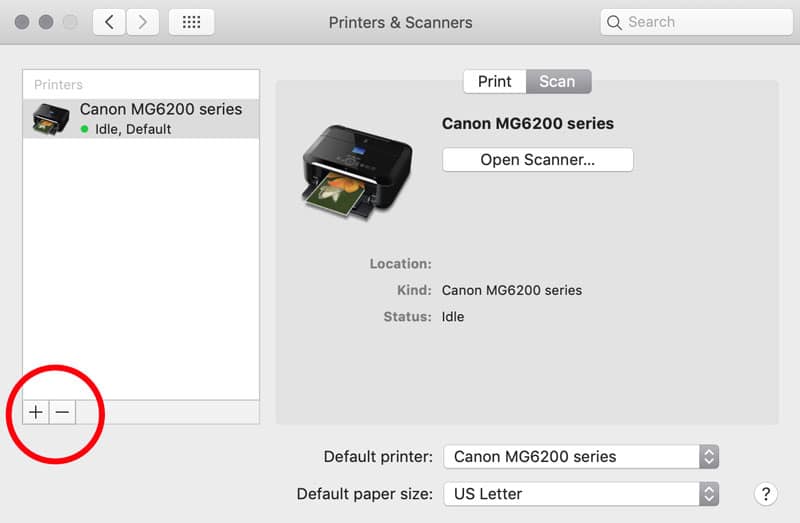
- Turn the scanner off and on again. At this point, it may reinstall itself automatically. If not, use the plus in the Printers & Scanners menu to add it manually.
- The scanner should be ready to use when it has a green dot under the device name.
Delete Scanner Apps from the Computer
Some scanning devices, such as HP models, include a scanning app. Go to the Applications folder on your computer and delete any existing scanning apps.
This step is only recommended if you know precisely what app you use to operate the scanner on your computer. Not all scanning devices will be associated with an app.
If you are unsure how to match your scanner to an app on your computer, skip to the next step.
Reset the Printing System
The final troubleshooting step when you cannot scan after upgrading to Mac OS X 10.10 is to reset the printing system. Note that this step will cancel any jobs associated with the device in the Printers & Scanners queue. It also resets all device settings back to factory defaults, removes preferences, and removes all devices from the Printers & Scanners list.
- Visit your computer’s System Preferences and click the Printers & Scanners option.
- Right-click or ctrl-click in the white pane on the left side where the printers are listed and select the option to “reset printing system.”
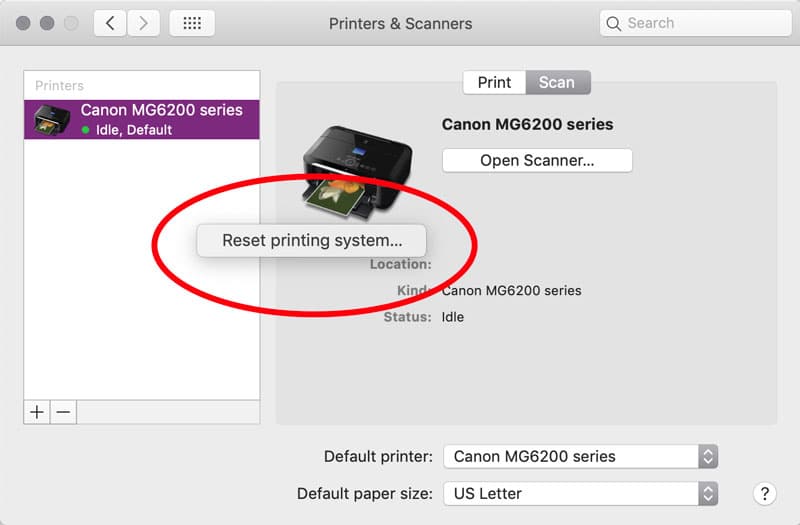
- A pop-up window will ask you to confirm the reset. Click “Reset” to confirm.”
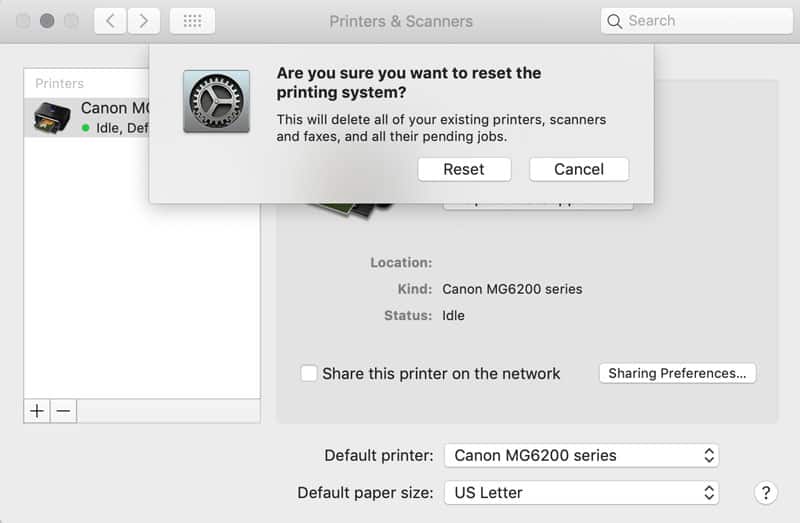
- Another window will open asking for your system administrator username and password. Once confirmed, the computer will reset the printing system.
Add Scanners
Once the printing system has been reset, you can re-add devices.
- Turn on the scanner for an automatic connection to the computer. If it does not connect automatically, re-add the scanner manually.
- Visit your computer’s System Preferences and click the Printers & Scanners option.
- Click the plus icon at the bottom right corner of the left menu. Click the name of the device you want to use and then click “Add.” This scanner is now available for use.

Use Driver Software to Manage Your Mac
Printers and scanners use tiny pieces of software called drivers to connect to your computer. While you can connect drivers manually, automatic driver updates can replace these steps and keep your devices functioning smoothly. Updated drivers can even prevent scanner issues before they arise.