Realtek HD Audio Low and Bad Quality Sound After Windows 10 Upgrade
Windows 10 is the latest version of Microsoft Windows, and well worth upgrading to. Not all upgrades go smoothly, however. What do you do if, after upgrading, your computer’s audio sounds bad or has extremely low volume?
When your audio sounds terrible after upgrading your PC – the sound is distorted, the bass is lacking, there’s screeching and chirping– it’s time to troubleshoot your problem and get it fixed. It probably has something to do with the Realtek HD Audio built into many computers today. Let’s take a look at how to fix Realtek HD audio low and bad quality after a Windows 10 upgrade.
Check Your Connections
It may sound too obvious, but when you’re experiencing audio issues you should always check all your cable connections, especially with a desktop system.
Most external computer speakers today connect via USB, so make sure that connection is solid. You may also want to try connecting to a different USB port on your computer.
If your external speakers connect via an analog audio port, double-check the connection. Wiggle the connector around a little and see if that makes a difference.
Also, and this should go without saying, make sure the physical volume knob is turned up on your speakers. Yes, sometimes the solution is that simple.
Finally, try connecting a set of headphones or earphones. If they sound okay, then the problem is probably in your speaker connections. If the headphones sound just as bad as the speakers, then the problem is internal. Remember, when you plug in your headphones the speakers typically go silent.
Increase the Volume
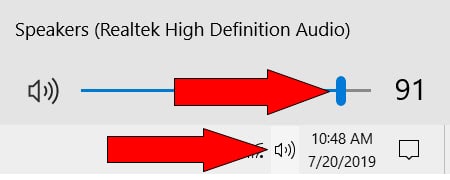
If your problem is that the sound volume is too low, and you have the physical volume controls turned up on your external speakers, you need to try increasing the volume on your system. You can do that from the Windows volume control by following these steps:
- Click the Speakers icon in the taskbar to display the volume slider.
- Use your mouse to drag the slider all the way to the right. Verify that the audio isn’t muted.
Change Speaker Properties
There are several settings related to your system’s speaker properties that can affect your computer’s sound quality. All of these settings are accessed from the Speakers Properties dialog box. To open this dialog box, follow these steps:
- Right-click the Speakers icon in the taskbar and select Open Sound settings.
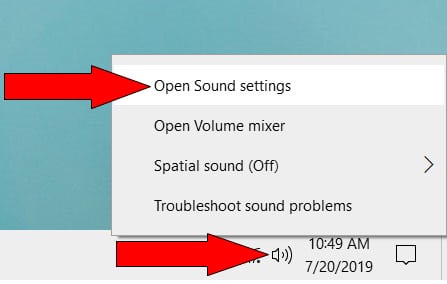
- This opens the Settings window with System page and Sound tab displayed. Scroll down to the Related Settings section and click Sound Control Panel.

- This opens the Sound dialog box. Make sure the Playback tab is selected, then select the Realtek High Definition Audio device and click Properties. This opens the Speakers Properties dialog box.

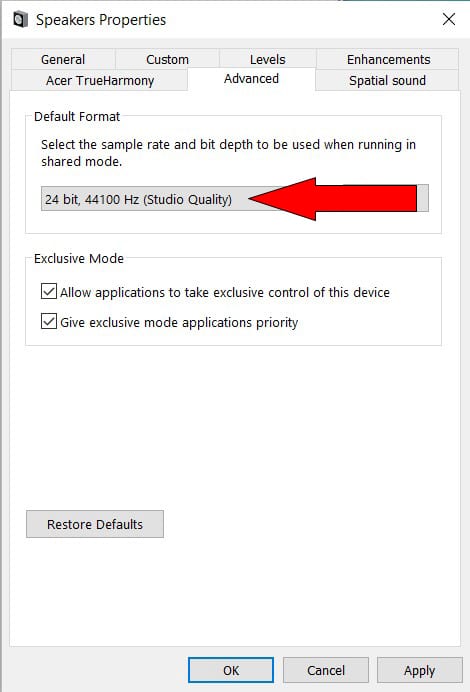
Adjust the Sound Quality
It’s possible that during the upgrade Windows default sound quality was inadvertently changed. There are three primary quality options – CD quality, DVD quality, or Studio quality, possibly with various frequency options. You might think that the highest quality is always the best, but this isn’t the case.
If you’re using lower quality speakers (including those included in many laptops), setting the sound quality too high can cause popping in your audio. Conversely, if the sound quality is set too low and you have really good speakers connected, you may need to increase this setting. Given all the different options, you’ll probably need to experiment somewhat.
To reconfigure this setting, follow these steps:
- From within the Speakers Properties dialog box, select the Advanced
- Pull down the Default Format list and select a different setting. (Try going lower, first.)
- Click Apply and see if this changes anything. If not, repeat and try selecting a different setting.
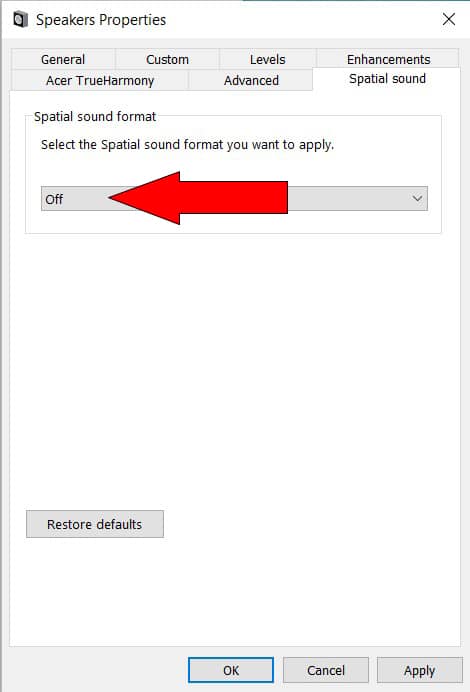
Disable Spatial Sound
Windows 10 includes an option for spatial sound, which enhances the sound field when you’re listening through headphones. Enabling this option can, on occasion, cause normal audio to sound not quite right. Follow these steps:
- From within the Speakers Properties dialog box, select the Spatial Sound
- Pull down the Spatial sound format list and select Off.
- Click Apply.
Disable All Sound Effects
Realtek HD Audio offers a variety of sound enhancements that can be applied to your system’s sound. You want to make sure that all of these sound effects are disabled so you’re getting a clean audio signal. Follow these steps:
- From within the Speakers Properties dialog box, select the Enhancements
- Check the Disable all sound effects
- Click Apply.
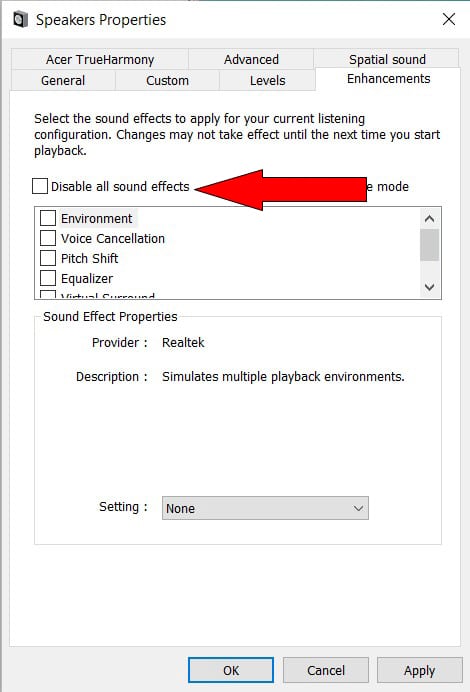
You may have to restart your computer for these changes to take effect.
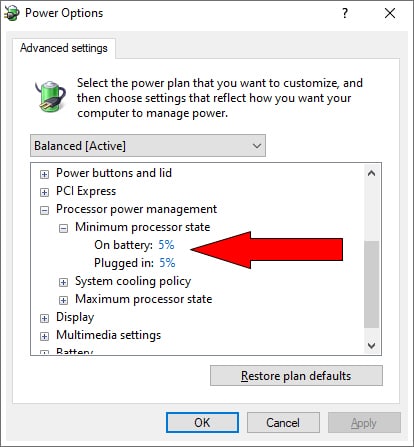
Change the Minimum Processor State
Windows lets you select from various power plans. This is important if you have a laptop computer, as some power plans turn off various system settings to conserve battery power. Unfortunately, settings in the default “balanced” power plan can affect audio quality.
It all has to do with something called the minimum processor state. When set too low, it can result in crackling and distorted sound. To increase this setting, follow these steps:
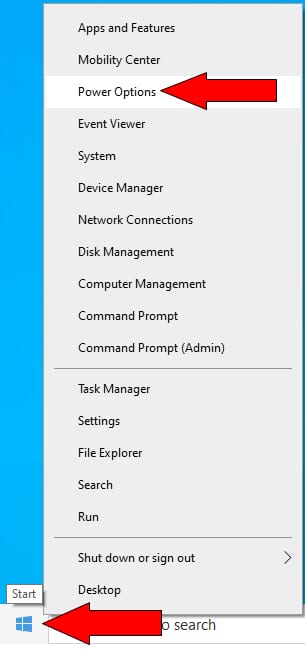
- Right-click the Windows Start button and select Power Options.
- This opens the Settings window with the Power & sleep page displayed. Scroll down the page to the Related settings section and click Additional power settings.

- This opens the Power Options control panel. Click Change plan settings next to the Balanced

- On the next page, click Change advanced power settings.

- This displays the Power Options dialog box. Scroll to and expand the Processor power management
- Expand the Minimum processor state
- Change the value from 5% (default) to 100% for both On battery and Plugged in.
- Click OK to save your changes.
Roll Back, Update, or Uninstall the Realtek Audio Driver
If your audio problems started after a recent Windows update, you may need to roll back the Realtek audio driver to a previous version that you know was working. To do this, follow these steps:
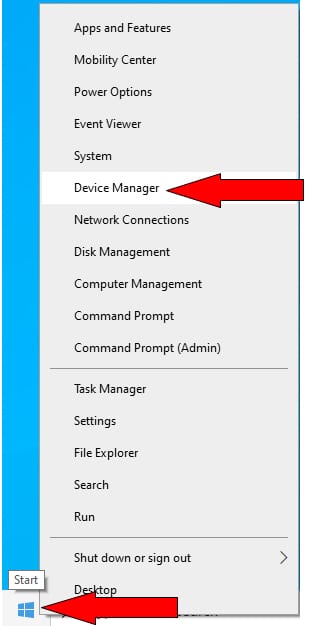
- Right-click the Start menu and select Device Manager.
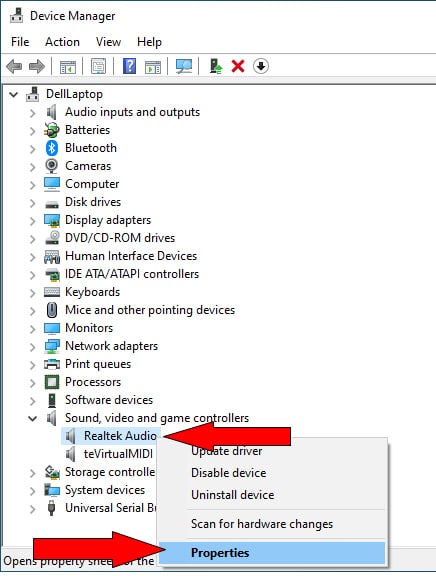
- Double-click to expand the Sound, video and game controllers section, then right-click the Realtek Audio driver and select Properties.
- This opens the Realtek Audio Properties dialog box. Click Roll Back Driver.
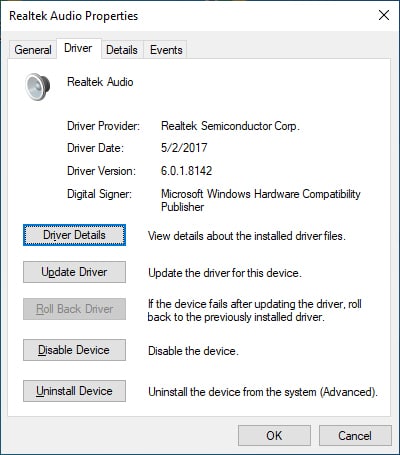
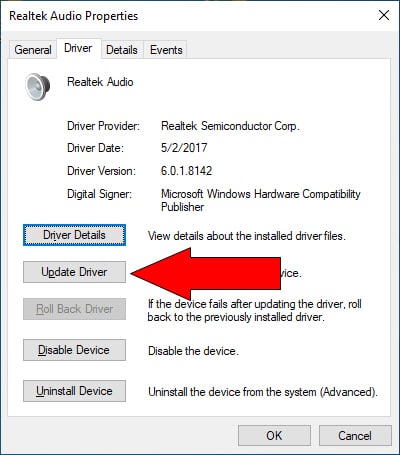
If that doesn’t work, you can try updating the driver to a newer version, if available. Follow the same steps but from the Realtek Audio Properties dialog box, click Update Driver. Windows will search for a newer version of the driver and, if it exists, install it. If Windows can’t find a new version, go to Realtek’s website and download it from there.
Switch to the Windows Generic Audio Driver
If all else fails and you still have audio problems, you can try switching to Windows’ generic audio driver. Here’s how:
- Right-click the Start menu and select Device Manager.
- Double-click to expand the Sound, video and game controllers section, then right-click the Realtek Audio driver and select Update Driver.
- When prompted, select Browse my computer for driver software.
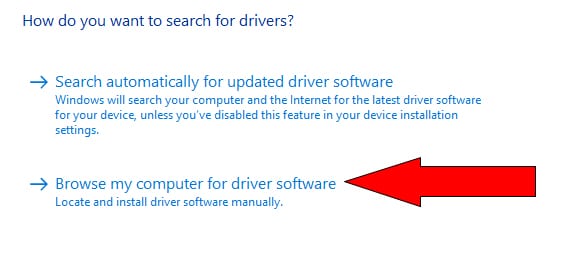
- On the next screen, select Let me pick from a list of device drivers on my computer.

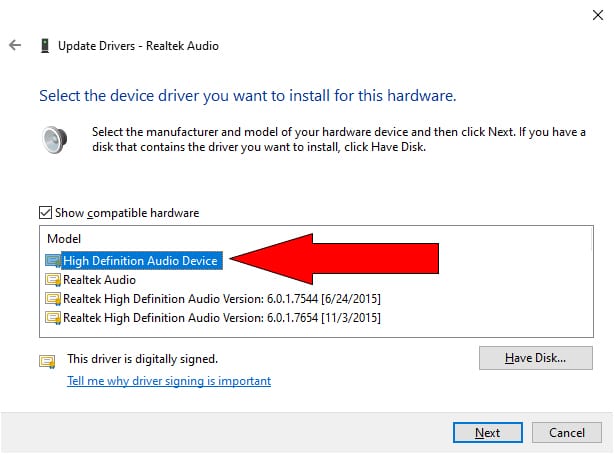
- On the next screen, select High Definition Audio Device and click Next.
- Follow the on-screen instructions to complete the installation.
Driver Support Can Keep Devices Up to Date
Updating or reinstalling your audio driver is just one example of how you can update system drivers to keep your computer operating smoothly. You can use Driver Support to keep all the drivers on your computer current and in prime operating condition.
Driver Support scours your system for all active device types supported. When you fully register the service, it automatically updates any drivers that are missing or out of date.