How to Install Drivers When No Intel(R) Adapters are Present
When updating your network drivers, you may see the message: Cannot install drivers. No Intel(R) Adapters are present in this computer. As frustrating as it seems, the Intel(R) adapter failure may prevent you from accessing the internet. The failure normally appears after reformatting your computer or after a system update.
What Does the Intel(R) Adapter Do?
The Intel(R) Network Adapter is a component that is integrated into your motherboard (it can also be a card connected to your motherboard via jumper cables). The adapter is used to communicate with other networks using TCP protocol by wire or wireless connections.
Assuming your network adapter is still connected, an erroneous Intel(R) adapter error may occur after a system update. This guide will help you resolve the software issues causing your Intel(R) adapter to fail.
Make Sure Your Driver Files Are Located in the Correct Folder
You’ll want to ensure that your device drivers are installed correctly. It’s possible that your driver files were installed into the wrong folder. Driver issues are especially common when upgrading Windows (Windows 8 to Windows 10 for example) or when reformatting your hard disk. Here’s how to check:

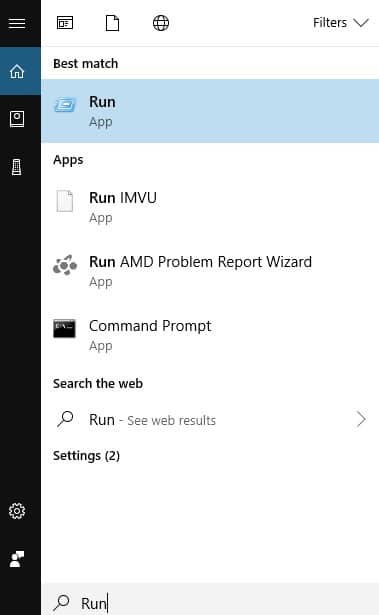
- Go to Start and search for File Explorer.

- Click the View tab and make sure Hidden Items is selected.

- On the left pane, make sure This PC is selected.
- At the far-right search bar, look up SWSetup. Ideally, your driver should be located in your C: drive which normally has the file path C:SWSetupDrivers.
Note: If your driver file is in the correct location the rest of this section can be skipped. If not, take note of the drive location (you’ll need it after the next few steps).

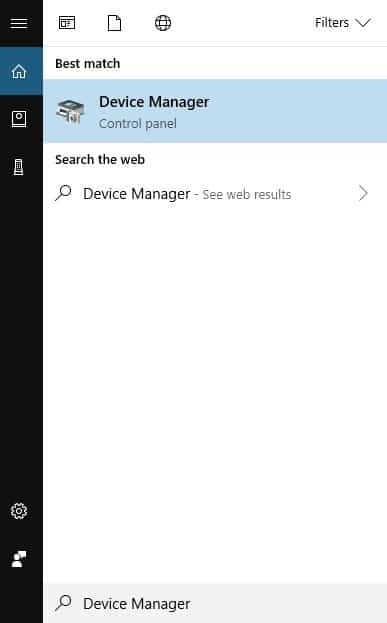
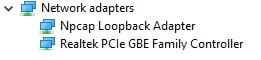
- Go to Start and search for Device Manager.

- Expand Network Adapters and search for your adapter.
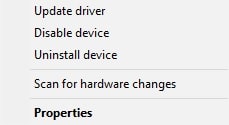
- Right-click your adapter and select Update Driver.
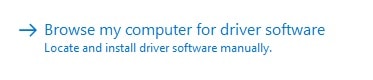
- Select Browse my computer for driver software and Navigate to your file discovered in step 4.

- Go to Start, select Power and
Locate Your Problem Devices
If your device diver files are correctly installed you might want to verify that other drivers are not interfering with your Intel(R) Adapter. Your network adapter is dependent on other hardware to run. Make sure that other hardware is not interfering with your ability to run the Intel(R) adapter. Here’s how:
- Navigate to Start and Search for
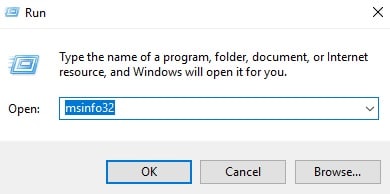
- Type msinfo32 and click

- Expand Components and Select Problem Devices. Take note of any problem devices that show up (you’ll need this for the next few sections).
Try Rolling Back Your Drivers
After you have located your problem hardware, you’ll want to roll back your network adapter and other components (if applicable). If your system was recently upgraded, your device drivers might have been automatically upgraded to a version that is not compatible with your Intel(R) adapter. It is easy to roll back your system:
- Go to Start and search for Device Manager.

- Expand Network Adapters and search for your adapter.

- Right-click your adapter and select

- From the Driver tab, click Roll Back Driver and follow the Prompts. Repeat steps 1-5 with all problem devices discovered in the previous section.

- Navigate to Start, select Power and Restart
Uninstall Your Network Adapter
If rolling your driver back fails to correct the issue, you might try uninstalling your network adapter. As long as your hardware is original, uninstalling your network adapter should force Windows to re-install your factory adapter. Here’s how:

- Go to Start and search for Device Manager.

- Expand Network Adapters and search for your adapter.

- Right-click your adapter and click Uninstall device.

- Navigate to Start, select Power and
Reset Your Network Adapter
You might want to try resetting your network if uninstalling your adapter fails to resolve your Intel(R) issue. Here’s how:

- Go to Start and search for settings.

- Navigate to Network & Internet.

- Select Status then Network Reset.

- Select Reset Now then click on Yes to confirm.
Try Updating Windows
A network reset might not always work if you’re running an older version of Windows. Older versions can create compatibility errors with your drivers. Updating Windows is easy. Here is how:

- Navigate to Start and search for settings.
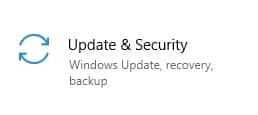
- Select Update & Security.
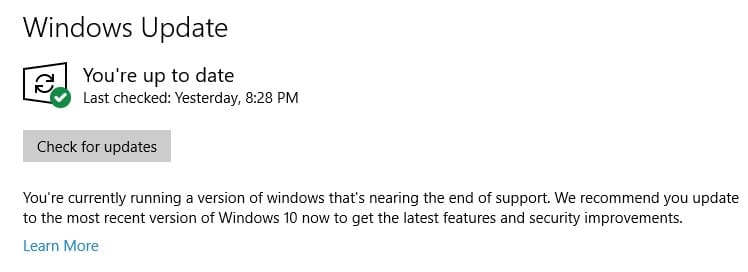
- Select Windows Update and install any pending updates.
Try Updating Your Motherboard and Adapter Drivers
If a Windows Update fails to get your Intel(R) adapter working, you will need to download and update your drivers manually. Windows updates may have caused compatibility issues with your current drivers so you’ll need to check if an Ethernet Driver Update is available.
Note: If the Intel(R) adapter prevents you from connecting to the internet, you will need to use a USB flash drive to download and transfer the files from a different computer with internet access. Follow the steps to upgrade:

- Go to Start and search for System Information.

- Record your system Model Number and perform an internet search for your computer drivers.
Note: You’ll want to try downloading your drivers from your computer manufacturer first. The computer manufacturer might have made custom drivers configured to your system design. If not, visit your motherboard manufacturer and download their listed drivers.
If the download is an .exe file, you can double click to install your new drivers. Install the chipset drivers first. If there are individual files continue on to the next step:

- Go to Start and search for Device Manager.
- Expand Network Adapters and search for your adapter.

- Right-click your adapter and select Update Driver.

- Select Browse my computer for driver software. Follow the prompts and install your USB driver files.

- Navigate to Start, select Power and Restart
Try to Restore Windows
You might try to restore Windows to an earlier point if driver updates fail to correct your issue. A new Windows update may be incompatible with your hardware until support catches up. Restoring Windows is easy:

- Go to Start and search for recovery.
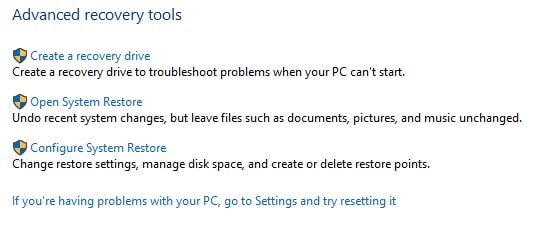
- Select Open System Restore.

- Select Next and follow the prompts.
Try to Reset Your System
As a last resort, you might try resetting your system. You’ll be able to restore your system to its factory default. Be sure to back up your files before doing a system reset. Here’s how to do this:

- Got to Start and search for settings.

- Select Update & Security.

- Select Recovery.
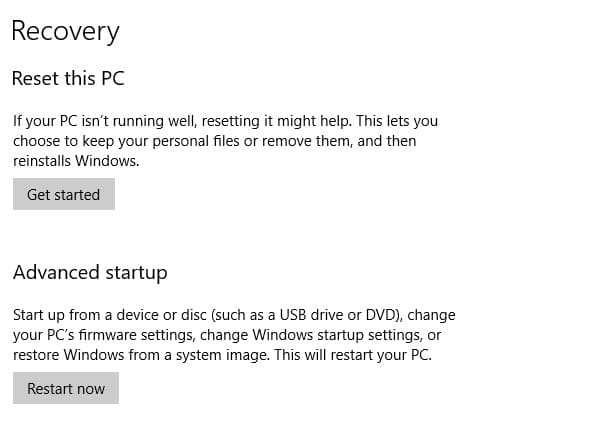
- Select Get Started and follow the prompts.
Keep your Intel(R) Adapter running smooth
As you might have realized, it can be frustrating getting the internet to work when you can’t receive proper updates. Many steps may be required: from searching updated drivers manually, to restoring or resetting your computer back to factory settings. It’s best to keep your drivers updated to prevent more adapter failures in the future.
It can be troublesome locating correct drivers. Use Driver Support to automate your driver updates and keep your system running smoothly. Stay connected to the internet and don’t let another Intel(R) driver failure ruin your day.