How to Fix Any NVIDIA Drivers Issues
Troubleshooting NVIDIA driver issues can be frustrating and time-consuming for users, especially if there’s no clear indication of what’s wrong. Some users report driver crashes while others simply cannot install any of the drivers after applying the latest update on the GeForce Experience. The issues can arise from a range of different causes including hardware failures, inadequate PC maintenance, Windows 10 Updates, or third-party software used on your PC.
Since early this year, users have been reporting a variety of issues with the latest NVIDIA drivers. As the company is currently working hard on improving their gaming technology, it could be that some bugs crept into the latest versions. However, you should perform some physical checks before resorting to reinstalling Windows or taking your PC to a repairer. This guide will show you how to fix any NVIDIA drivers issues on your PC.
Perform Physical Checks and PC Maintenance
If you’re using a laptop, skip these steps. For Desktop users, you’ll need to ensure you clean your internals at least once every six to twelve months. Due to dust build-up in the housing that leads to thermal increases, components and cards may start malfunctioning intermittently.
Please note if you’re not familiar with PC internals and components, it would be better to take the PC to a shop and have it cleaned for you.
Cleaning Dust from Desktop PCs
- First, switch off your PC and unplug it from the electrical cord.
- Move the PC (if required) to a clean environment.
- Use compressed air (available at most PC shops) to blow all the internal components to remove the dust. Ensure you remain a couple of inches away from the motherboard, expansion cards, and processors.
- Remember to blow all the fans and power supplies as well to remove the dust. To clean the fan properly, you can hold it in place with a finger while applying the compressed air.
- Once you’ve cleaned all the internals, replace the case and reconnect the PC.
Note if you see any persistent dust buildup on any component, you can use a lint-free cloth with 99% isopropyl alcohol to wipe the grime away.
Check all Wires and Connections
- While you have the PC open, remember to check all the wires and connectors. It could be that vibrations created loose connections.
- Ensure all the leads and connections are firmly in place on the expansion cards but do not connect any wire that is loose unless you know what you are doing.
- Close the PC before reconnecting it to the electrical power cord and power it up to see the results.
If you still face issues after cleaning the PC, you’ll need to reinstall all your NVIDIA drivers.
Perform a Clean Install of a Stable NVIDIA Driver
If you’ve already attempted a clean install of the drivers (i.e. removing all the NVIDIA Software and reinstalling it), you may have to use Display Driver Uninstaller to fix the issue.
Downloading and Installing the Display Driver Uninstaller (DDU) Application
The regular uninstaller for NVIDIA software may leave remnants of the drivers in the PC’s registry. To remove the software completely, use DDA to uninstall the drivers.
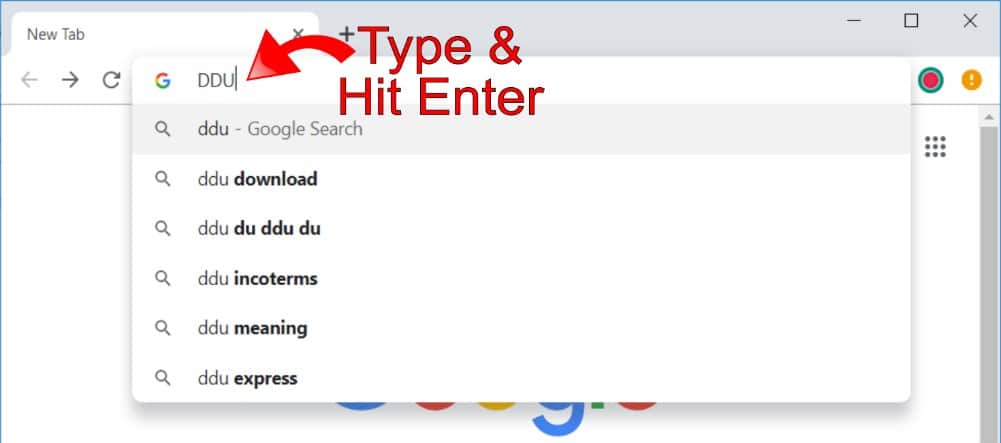
- In Google, type DDU and hit Enter to search for the software.
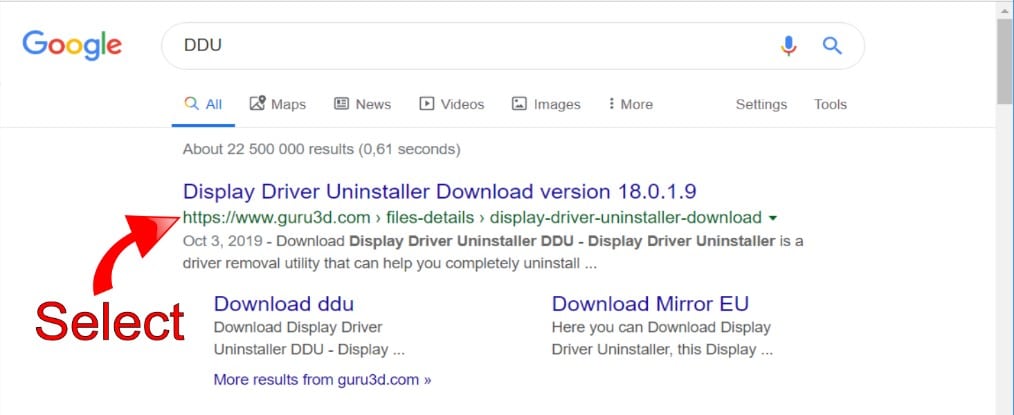
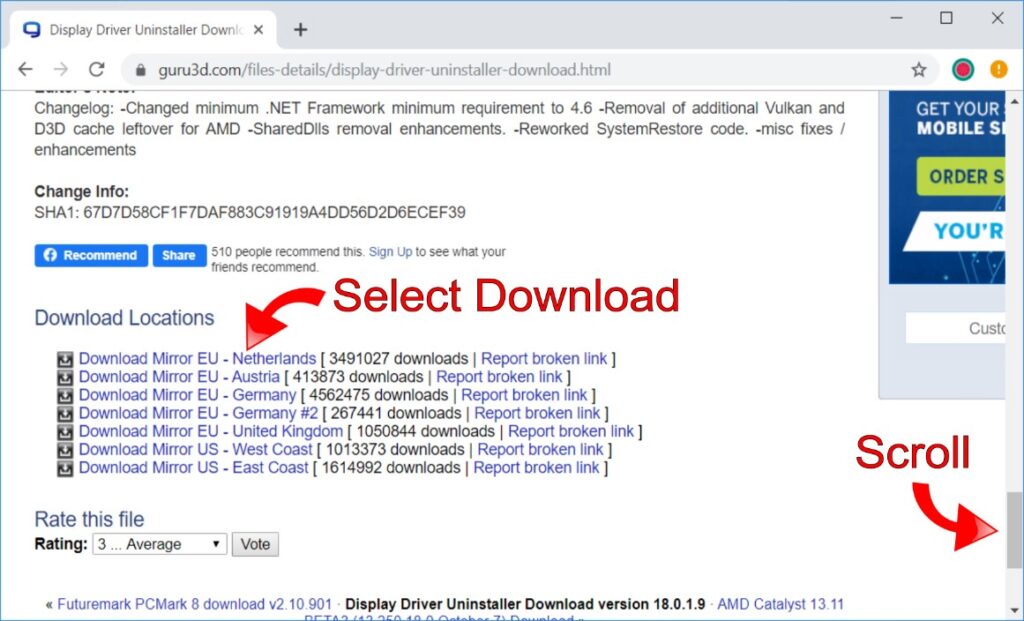
- Ensure you select the top result from the list of sites.
- On the site, scroll down and look for the latest version of DDU.
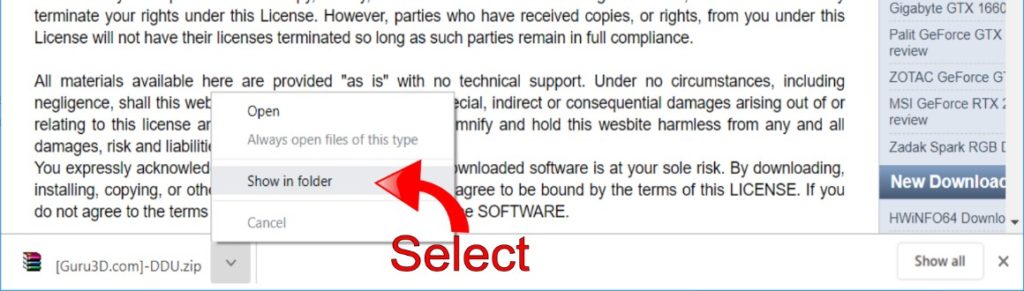
- Once the download completes, locate the file on your PC by clicking on the Up arrow next to the file and selecting Show in Folder.
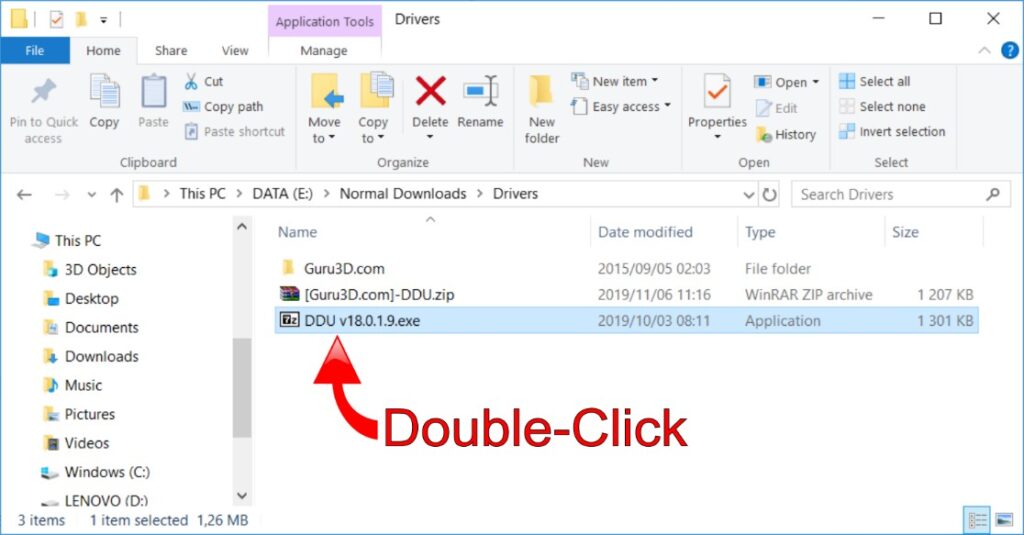
- You’ll need to unzip the package using an archiver tool by clicking on the download with the Right Hand Mouse Button (RHMB) and choosing Extract Here. Windows 10 comes with one included, but for older versions may need you to download and install Zip7 or WinZip.

- Once you’ve extracted the files, you can double-click on the DDU application to start the installation process.
- You’ll receive a prompt to select an installation folder. Ensure you select the same location as the downloaded file.
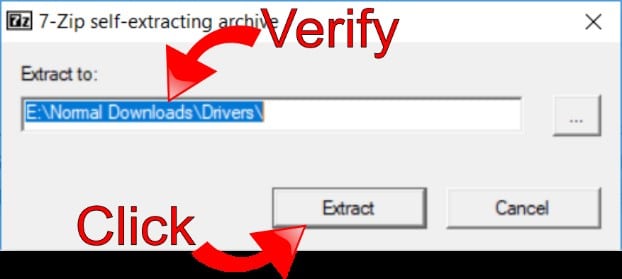
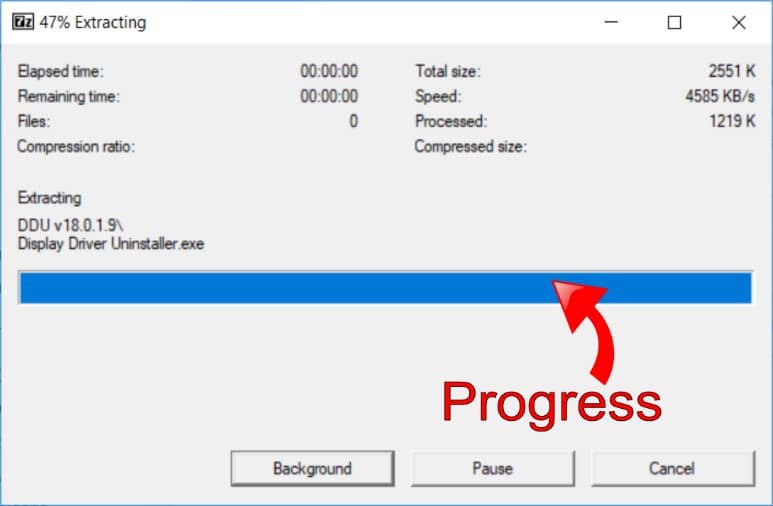
- You can track the progress as the package extracts.
- Once the software finishes unpacking, you’ll see a new folder added to the current location. Double-click to open the folder.
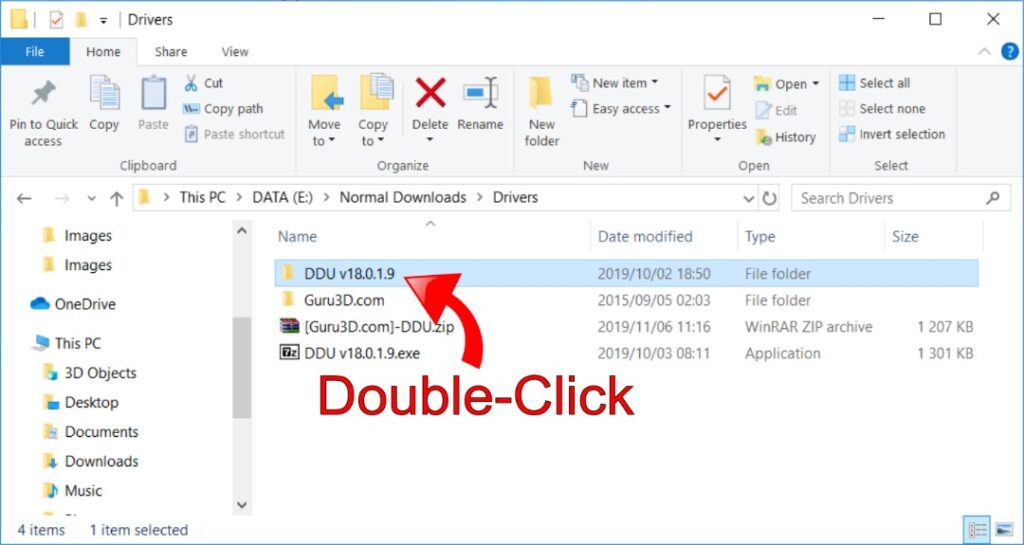
- You can now run the Display Driver Uninstaller software by double-clicking on the executable file.

- When you start DDU for the first time, you’ll receive a prompt that warns you about the software. As the software changes registry values and settings, it’s important that you know the risks with these operations.
To ensure you can recover from any unexpected issues, you may want to make a backup or restore point on your PC before proceeding. While the software will remove the corrupt drivers and binaries, it clearly states that it could make things worse. Once you’ve created a backup or restore point, you can proceed with the removal by clicking OK.

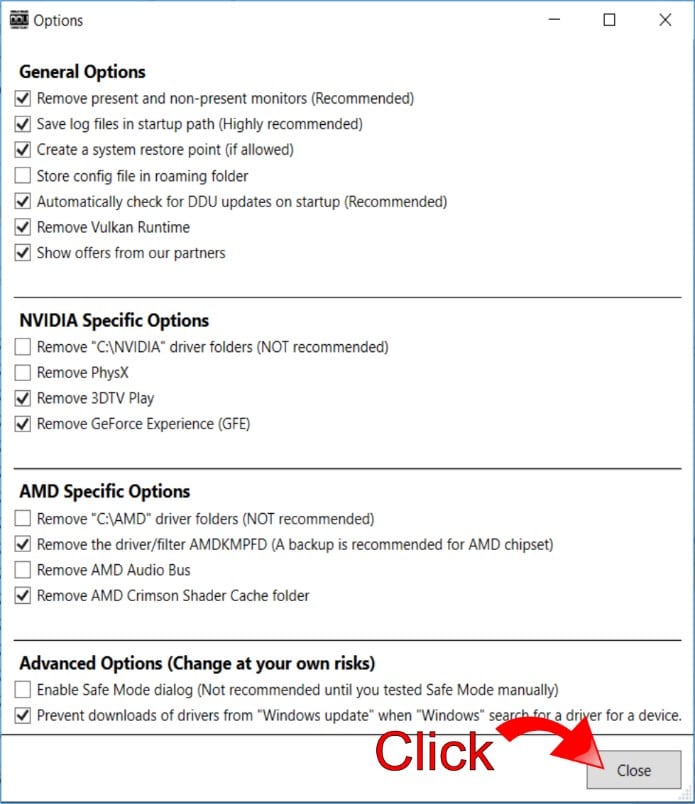
- When you click OK, you’ll see the current settings the software uses. The developers recommend you use the default settings, so click Close without making any changes.
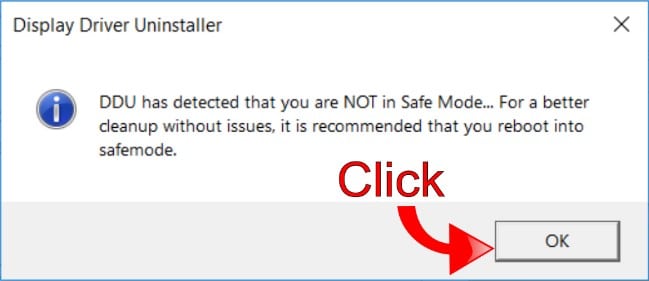
- You’ll see another prompt asking you to reboot in Safe Mode before running the DDU software cleaner. Although it’s recommended, many users report experiencing no issues with using the product in Normal Mode.
- If you want to reboot in Safe Mode before continuing, click OK to close the notice. Then reboot in Safe Mode on your PC. The process of rebooting in Safe Mode has different steps in Windows versions and the following will be based on Windows 10’s operations.
- Now hit the Windows Key and type Startup Options, then select the Change Advanced Startup Options. If you want to skip this and continue running Windows in Normal Mode, go to the Running DDU to Remove NVIDIA Drivers section.

- Select Restart from the Advanced Startup section.
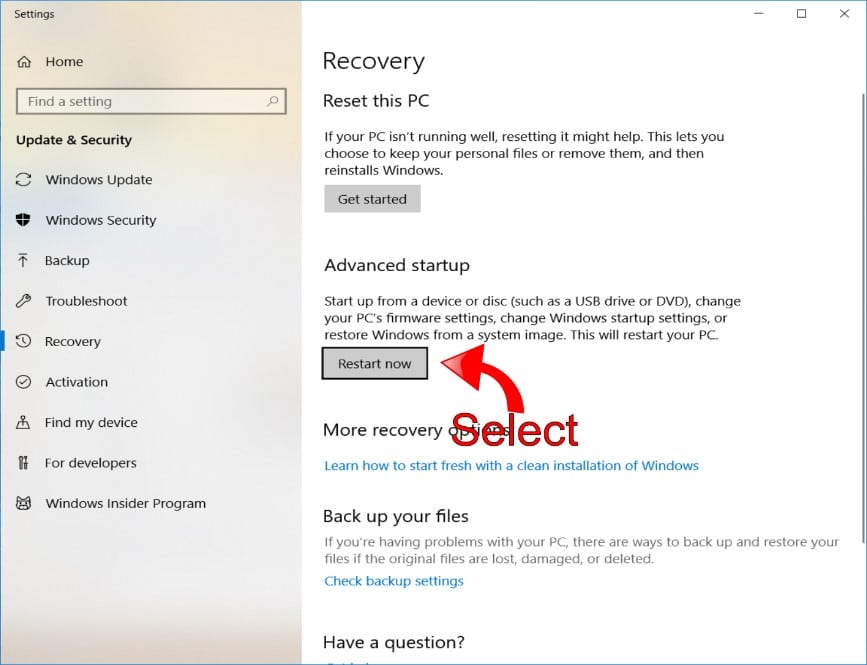
Note that once you click Restart Now, you’ll be taken to the Windows boot options. To restart in Safe Mode follow the steps below.

Rebooting in Safe Mode
- Click on Troubleshoot on the first page.
- Select Advanced Options.
- On the Advanced Options page, click Startup Settings.
- From the Startup Settings page, select Restart.
- Use the F4 key to reboot the PC in Safe Mode.
Running DDU to Remove NVIDIA Drivers
- To remove the NVIDIA display drivers, select GPU from the Device Type dropdown list.
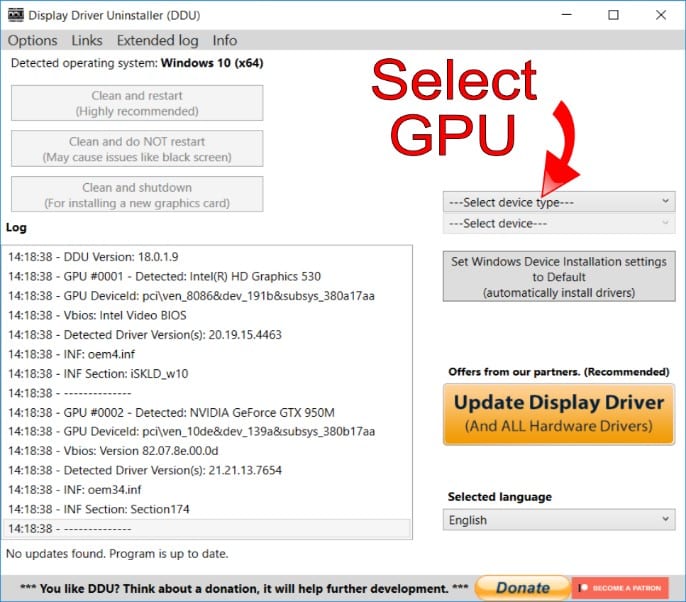
- Now select NVIDIA from the Device dropdown.

- If you want to manually select which NVIDIA driver to use after removing the current versions, disconnect from the internet before proceeding.
- Click on the Clean and Restart option from DDU to clean all the drivers from your machine.

- After the computer restarts, go to the NVIDIA site and download the latest driver (or use the search to find older drivers).
Note that users report facing issues with using GeForce Experience, so choosing the driver using the manual search may provide you with better results.
- When you’ve downloaded the driver, locate the file and start the installer.
- To select a Clean Install, select the Custom Settings once you reach the Options step.
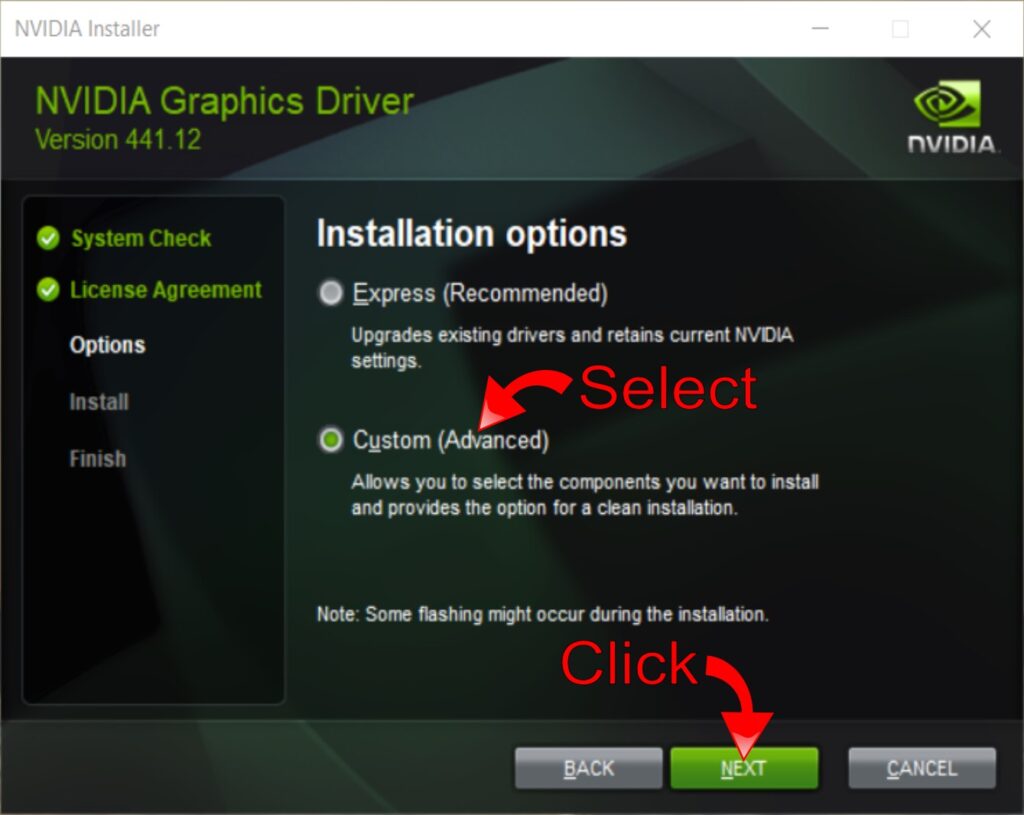
- Ensure you tick the Perform a Clean Install option before clicking next.
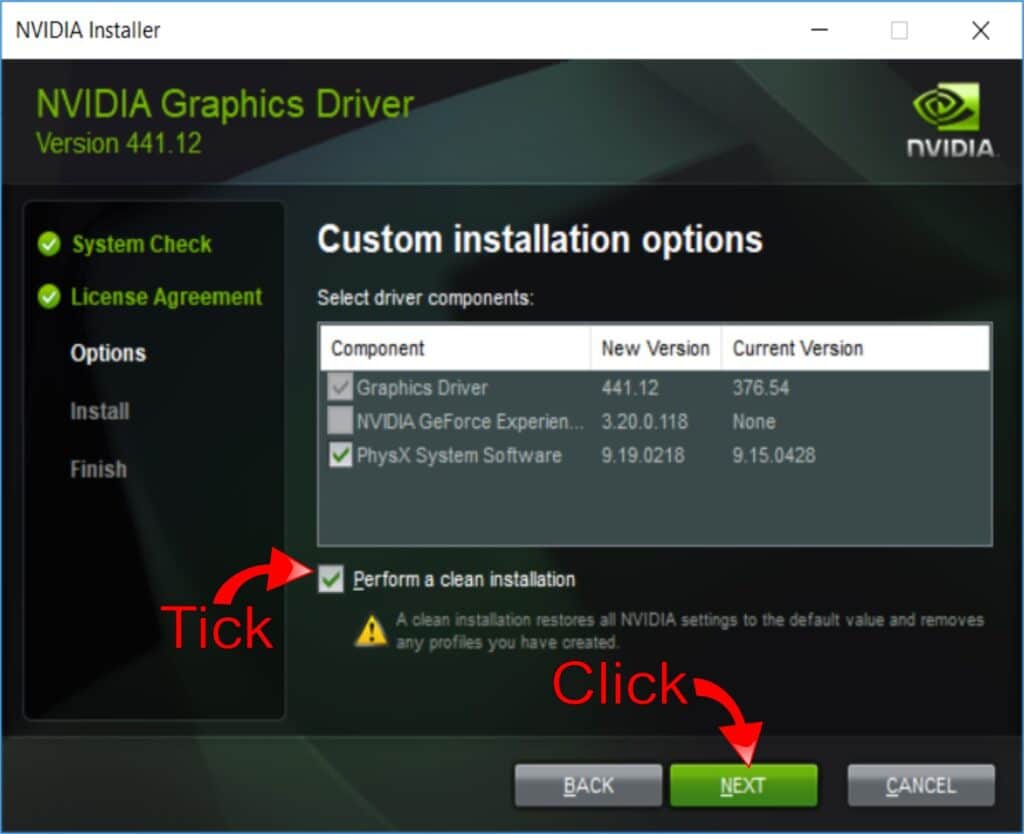
- Wait for the installation to finish and reboot the PC. Your NVIDIA driver issues should now be resolved.

Use Driver Support to Manage Your GPU Drivers and Avoid Problems
By using Driver Support, you can avoid performance and GPU issues in the future. Driver Support creates an inventory of your devices and hardware, helping to manage all your drivers for you. It will also ensure your devices perform better with Active Optimization. You can also back up your drivers in order to roll back if anything does go wrong after a driver update.
For the best GPU performance and reduced device errors, Give DriverSupport | ONE a try today!